Sunday 29 January 2017

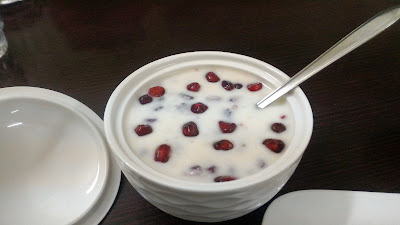
Pomegranate Raita

After the bagel baking post I did bake a few other breads but wasn’t able to get my hand on the camera as I always ran late with all the other jobs that I had to give time too.  And when I finally thought that I am going to dedicate all my time to baking and getting the pics clicked.  Bam!!!  There goes the oven in for a toss.  Guess the oven said pl I need a break too.  Placed order for a new oven that is yet to be delivered, I thought let me get on to making other yum cooking.  So today I have for you all, a combo meal that I happened to put up with last minute.  Not much of a thought process involved here, I just put together capsicum cashew masala, pomegranate raita, beetroot and potato tikkis/cutlets and naan.  So here goes the first recipe, will begin with the easy peasy one.  The pomegranate raita. 
INGREDIENTS:
Curds/Yoghurt
1 cup abt 250 ml
Pomegranate seeds/arils
1/2 cup
Salt
A pinch
Sugar
1/2 tsp
Chat masala
1/2 tsp (optional)
Roasted cumin powder
1/2 tsp

METHOD:
1.       Take the yoghurt in a bowl and whisk it smooth. 
2.       Add in the salt, roasted cumin powder and sugar and mix well.
3.       Add the pomegranate seeds/arils in the yoghurt and mix well until combined.  If you have the juice of the pomegranate, add in the juice about a tbsp of it.  (it adds a nice colour and taste to it).  I didn’t have any left after deshelling the pomegranate.
4.       Sprinkle chat masala (if using).  Serve and enjoy with flavoured rice or pulav, or the main course that you have planned.
NOTES:
1.       I have added only half a tsp of sugar, you could add the sugar as per your taste.
2.       Garnish with coriander leaves before serving.  Since I ran out of coriander leaves I couldn’t add them.
3.       You could make it ahead of lunch/dinner and serve it chilled.
4.       Increase the quantity as per your requirement.  This measure that I have given for serves 2. Well if you like to have it by yourself then I would say serves 1.
Will be putting up the other posts of the combo soon.


Saturday 28 January 2017

Gulab Jamun


Wanted to make this as my post post of the New Year.  Late but Here's wishing you all lovely people a  very happy n prosperous new year.  May you all have a fabulous year ahead.  I know I am a tad bit late and my apologies.  I know, I have been a bit irregular, not that I haven't been cooking or making anything special.  Just that I had been caught with so many other things (won't get into the details of it lest I make a post of my delay's, haha) that I could not get myself to get the draft ready or take pictures.  I know I always have this as an excuse after am "missing in action" but I do get caught up with something or the other more often than not.  So, getting to today's post.  Beginning it on a sweet note.  This one can be made with khoya (solidified milk) or milk powder like the one I have made today.  And easy recipe which gets done in a jiffy.  if u have a liking for sweets am sure you are going to like this one.  So here goes the recipe for gulab jamun. 

INGREDIENTS:
For the gulab jamun:
Milk powder
3/4 cup
All purpose flour/maida
1/3 cup
Semolina/rawa/sooji
1/8 cup
Baking soda
1/4 tsp
Ghee (melted)
1 tbsp
Curds (whisked)
2-3 tbsp
Ghee/oil
For frying

For the sugar syrup:
Sugar
1 cup
Water
1 cup
Green Cardamom (powdered)
3-4 pods
Lemon juice
1 tbsp

METHOD:
For the sugar syrup:
1.       In a pan add the sugar and water and keep on high flame and let it boil.  Stir at regular intervals.
2.       Once it comes to a boil, lower the flame and let it simmer till the sugar is completely dissolved and the syrup turns slightly golden.
3.       Add in the powdered cardamom and mix well.  Add in the lemon juice and stir well so that it mixes well.
4.       Switch off flame and cover and set aside. 
For the gulab jamun's:
1.       In a wide bowl add the milk powder, all purpose flour and semolina and mix well.
2.       Add in the baking powder and melted ghee and mix well again.
3.       Add in the whisked curds 1 tbsp at a time.  Mix very lightly to form a soft but non-sticky dough.
4.       Grease your palms with 1/4 tsp ghee and make small balls of the dough taking care that there are no cracks on the jamun's (if there are cracks they would break open while frying) and keep them ready to fry.
5.       Heat ghee in a wok/kadai on a medium flame.  Once hot lower the flame.  Fry the jamun's few at a time until golden brown rolling them very lightly. Drain them on a tissue paper.
6.       Re-heat the sugar syrup if it has turned warm.  Switch off the flame and add the fried jamun's to the hot syrup and cover and keep them immersed in syrup for 2-3 hours.
7.       Serve hot or cold garnished with slivered pistachios or almonds.
NOTES:
1.       I have used curds, you could use warm milk.  I required only a tbsp and a half of the curds mentioned.  So pl add only a tbsp at a time and knead lightly.
2.       I made small balls as they will double in size.  While frying as well as in the sugar syrup.
3.       The number of jamun's that i got from this measure is 16.  So they would serve 6-8 people.
(Will post gulab jamun's with khoya reduced milk some other time.)

Sunday 22 January 2017

Mutter shufta


Today, it’s a very simple recipe with no much time required to be spent in the kitchen to prepare this yummy dish.  Mutter, otherwise known as, green peas here..  It's a Kashmiri main course, as far as I know.  Though of course, I have heard that it is more of a dessert with dry fruits in sugar syrup.  This is a recipe that I had seen in a book and had made about years back.  Browsing through the pantry, I seemed to have all the ingredients that you need to make this green peas gravy.  It made me nostalgic, that I immediately set out to make this wonderful dish.  I seemed to have misplaced the book in which I had written the recipe, so crossing my fingers that it does turn out the way we used to make I started with the recipe.  The result, yum yum.  Turned out exactly the way I wanted it.  Though there could be a slight difference in the measure of ingredients.  Served it here with butter garlic naan.  This was an awesome combo and was a hit.  So, do try this wonderful green peas gravy which makes you feel like having  a great restaurant dish at home.
INGREDIENTS:
Green peas (frozen or fresh)
1/2 cup about 100 gms
Oil
1/2 tsp
Cumin seeds
1/4 tsp
Yoghurt
1/2 cup
Khoya/ricotta cheese/paneer
1/3 cup
Turmeric powder
1/2 tsp
Red Chilli powder
3/4 tsp to 1 tsp
Garam masala
3/4 tsp
Kasuri methi/dry fenugreek leaves or powder
1 tsp
Salt
1/2 tsp or As needed
Coriander leaves
A little to garnish

METHOD:
1.       Wash the peas and boil them for 10 minutes.  Crumble the khoya (reduced milk), cheese or paneer and keep aside.  Also, whisk the curds and set aside.
2.       In a kadai/wok heat oil and add cumin seeds.  Once they splutter add the crumbled khoya, cheese or paneer (whatever you are using) and the curds and stir it on a low flame so that it does not curdle. 
3.       Once you see small bubbles at the sides of the wok add in the turmeric powder, chilli powder and mix well.
4.       Add the peas and salt and stir well to combine.  Raise the flame to medium and bring it to a boil, adding 1/4 cup/50 ml of water.  This should take about 10 minutes.
5.       Add in the garam masala and let it simmer on low flame for another 5 minutes.
6.       Lastly add in the kasuri methi by crushing them in between your palms and switch off the flame.
7.       Serve hot garnished with coriander leaves.  Enjoy it pulav, roti's or naan, choice is yours.

NOTES:
1.       This dish is usually prepared with khoya (reduced milk), I have used khoya in the recipe that I made.  But, if you are not able to get khoya you could make it with paneer or cheese.  Am sure it turns out well.  Though I haven't tried it with the other two.  Just see to it, that the cheese or paneer are fresh.
2.       The recipe that I have given serves 2-3 people.
3.       Do not miss out the fenugreek in the recipe as that gives this dish a wonderful taste that you would look for.
4.       Pl add the chilli powder and salt as per your taste.

Wednesday 11 January 2017

Bagels

Hello everyone.  So getting back to the post I have for you all today, is awesome.  Most of you would or might be familiar with bagels, but  I want to let you all know how I made these beauties.  Loved every bit of it, these bagels are super yum.  So here goes...
INGREDIENTS:
For the dough:
All purpose flour/maida
1 cup
Whole wheat flour/atta
1 cup
Wheat vital gluten
1 tbsp
Instant yeast
1 1/2 tsp
Warm water
3/4 cup
Salt
1 tsp or as per preference
Sugar
1 tsp

For the topping:
Sesame seeds
1/4 cup
Chilli flakes (optional)
1/8 cup
Salt
1 tbsp
Milk For brushing the bagels
2 tbsp

For water bath:
Water
1 litre
Honey
1 1/2 tbsp
 
 
METHOD:
1.       In a bowl take warm water and add in a tsp of sugar.  Stir well to dissolve.  Add in the yeast and stir well again n keep aside to froth.  About 5 minutes or so.
2.       In a bowl of a stand mixer whisk in the flour and salt well. (You could do the kneading by had if u wish or a stand mixer with the dough attachment).  Then slowly add in all of the yeast and water mixture and start kneading on a low speed till all the flour and yeast mixture get incorporated well.  Once that happens increase the speed to medium and knead well for about 8-10 minutes
3.       The dough make look or seem dry, but do not add more liquid.  Transfer the dough on a lightly floured surface and knead again to bring the dough together into a ball.  Grease a bowl with oil and place the dough into it turning it to coat it in oil on all sides.
4.       Loosely cover the dough with a cling wrap or a clean kitchen towel and let it rise for about an hour or so.  Dough should look large and puffy.  (will post step by step pictures the next time I bake them again)
5.       Once its ready (after about an hour or hour n a half), transfer on to a clean kitchen surface and knock the dough down lightly.  Shape them into to 6 small balls.  (I got six small balls, it depends on the size you make them).
6.       Once the dough is shaped into balls make a hole in the center by poking your index and middle finger into the shaped ball.  Or you could use a small cutter if you have one to make the hole in the center.  About 1.5-2 inches in diameter.  Cover the shaped bagels with a damp cloth and place them on a tray lined with parchment paper or on a silicon mat.  Heat the water and honey for the water bath.
7.       Once the water comes to a boil, switch the flame to a medium or medium high so as to let the water keep simmering.  Drop in the bagels 2-3 at a time depending on how big or wide your pan is.  As the bagels need space to float around in the pan freely.  While these our getting their water bath, preheat the oven @200⁰C.
8.       Cook the bagels for a minute on each side.  Drain them on a wire rack lined with parchment paper so that they don’t stick to the wire rack.  They will look a little crimpled.  That should be fine.
9.       Brush the bagels with milk and sprinkle them with sesame seeds, chilli flakes and salt.  Or you could mix these in a bowl and dip the milk brushed bagel into it, so that it gets coated evenly.
10.    Bake them in a preheated oven for 15-20 mins so that they get a nice golden brown colour.  Remove the bagels and allow them to cool before you dig into them.
11.   Slice them, warm them up in a micro or simply toast them, enjoy your bagels just the way you like it.

NOTES:
1.       Mine took 15 minutes to bake.  It entirely depends on your oven time.  So pl do keep a watch after 15 minutes.
2.       I got six bagels with this recipe. 
3.       You could add diced dried garlic, poppy seeds, finely chopped onions or dried onions finely chopped and deseeded tomatoes as toppings.  Choice is entirely yours. Though I would like to add that onions to tend to burn off easily so you could go a little low on that if adding.
4.       If doing the whole process by hand do knead the dough for a good 15 minutes.